

Flower nail art is having a major moment — and the best part? You don’t need to be a professional to pull it off. Whether you’re a total beginner or just looking for fresh spring nail ideas, these 5 stunning floral nail designs prove that beautiful nails are easier than you think.
From a genius bobby pin hack that anyone can try at home, to elegant French tips with delicate daisies — we’ve got a flower nail design for every skill level, every style, and every occasion. Save this guide, pick your favorite, and let’s get started.
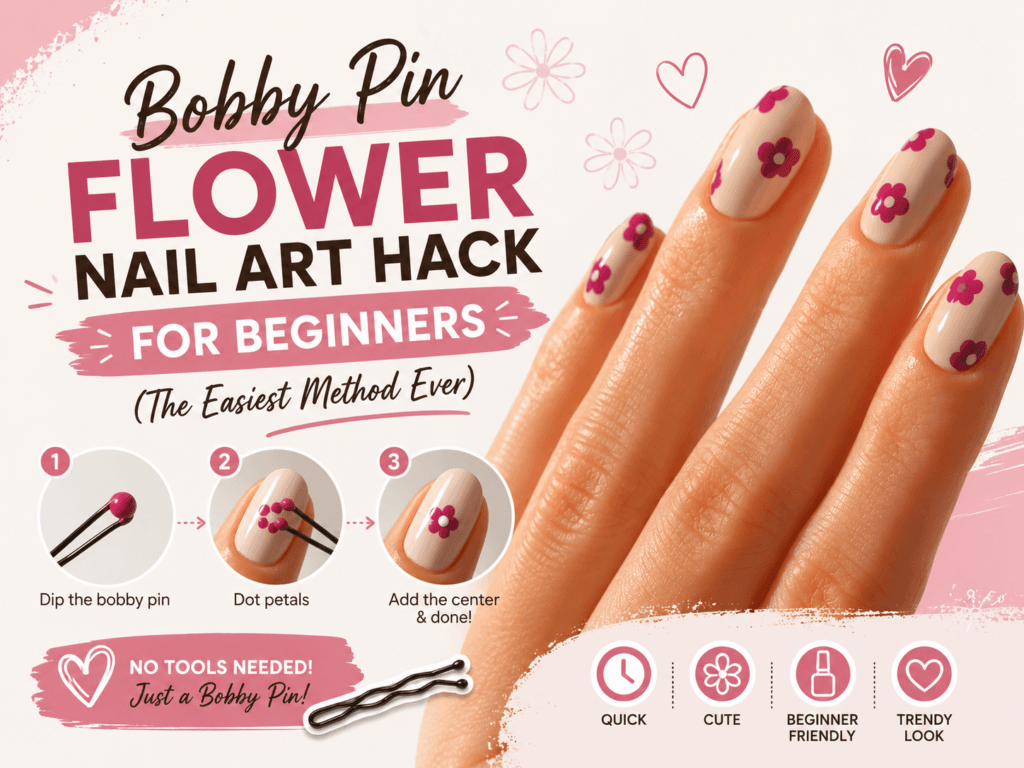
1. Bobby Pin Flower Nail Art Hack for Beginners (The Easiest Method Ever)
If you’ve ever struggled with nail art brushes, this bobby pin hack will change everything. This is hands-down the most beginner-friendly flower nail technique out there — and the results look incredibly professional.
What you need:
- A bobby pin (yes, just a regular hair pin)
- A neutral or beige base coat
- A bright nail polish in your chosen flower color (magenta, pink, or any bold shade)
- A white or contrasting color for the flower center (optional)
- Top coat
How to do it — step by step:
Step 1: Apply your base color and let it dry completely. A nude, beige, or cream base works best because it makes the flowers pop.
Step 2: Dip the rounded end of a bobby pin into your flower color polish. Don’t overload it — just a small dot of polish on the tip.
Step 3: Press the bobby pin gently onto the nail to create one petal. Make 5 dots in a circle, each one slightly overlapping the center, to form a flower shape.
Step 4: Repeat across all nails, spacing the flowers randomly for a natural, scattered look. You can do 1 large flower per nail or 2–3 small ones for a fuller effect.
Step 5: Add a tiny dot of white or yellow polish in the center of each flower using the very tip of a toothpick or the bobby pin itself.
Step 6: Seal everything with a glossy top coat.
Pro tip: Wipe the bobby pin clean between each flower to keep your dots crisp and defined. This one small step makes a huge difference in the final look.
This technique works beautifully with any color combination — try white flowers on coral, lilac on nude, or magenta on beige for a bold spring statement.
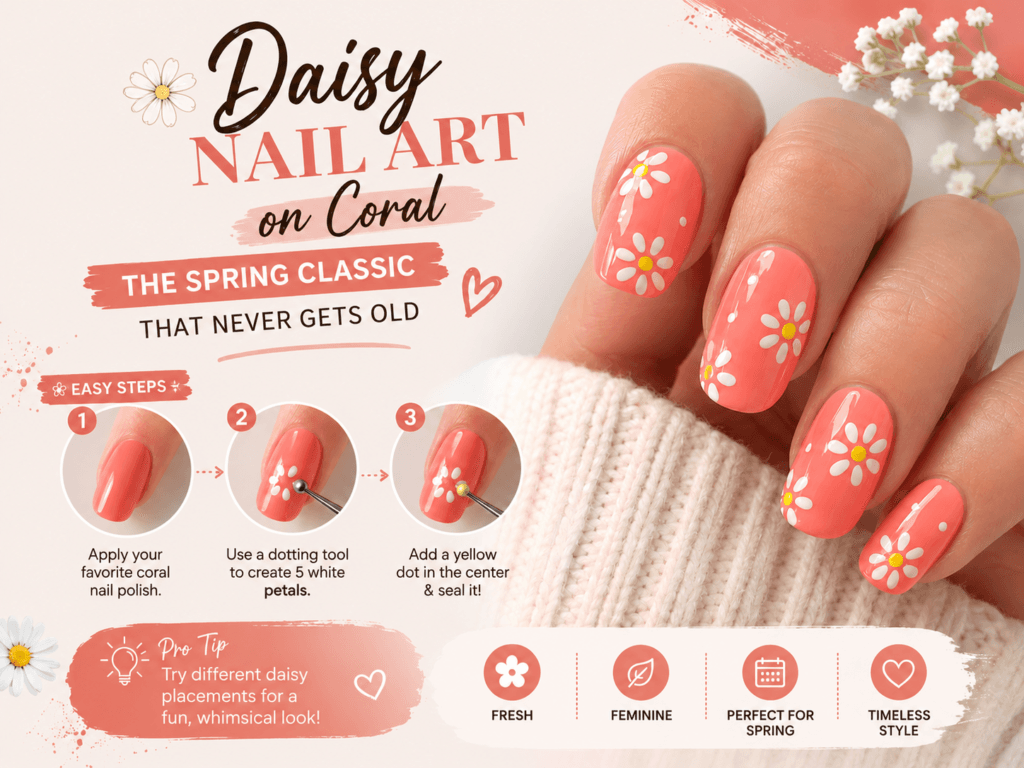
2. Daisy Nail Art on Coral — The Spring Classic That Never Gets Old
If there’s one floral nail design that screams spring, it’s white daisies on a warm coral base. This look is cheerful, feminine, and surprisingly easy to recreate at home.
The key to this design is the contrast between the warm coral base and the crisp white petals. The tiny yellow centers add just the right pop of color to make the daisies look realistic and polished.
What you need:
- Coral or peach nail polish (base)
- White nail polish (petals)
- Yellow nail polish or a yellow nail art pen (centers)
- A thin nail art brush or dotting tool
- Top coat
How to recreate this look:
Step 1: Apply two coats of coral polish and allow to fully dry.
Step 2: Using a thin brush dipped in white polish, paint 5 to 6 elongated oval petals arranged in a circle on the nail surface. Keep the petals slightly separated so each one is distinct.
Step 3: Add a small yellow dot in the center of each daisy. This step ties the whole design together.
Step 4: For accent nails, leave some fingers in solid coral and add daisies only to the ring finger and middle finger. This creates the trendy “accent nail” effect without overwhelming the look.
Step 5: Finish with a glossy top coat to seal and protect.
Style tip: This design looks stunning on short, rounded nails. The compact shape keeps the flowers looking neat and proportional.
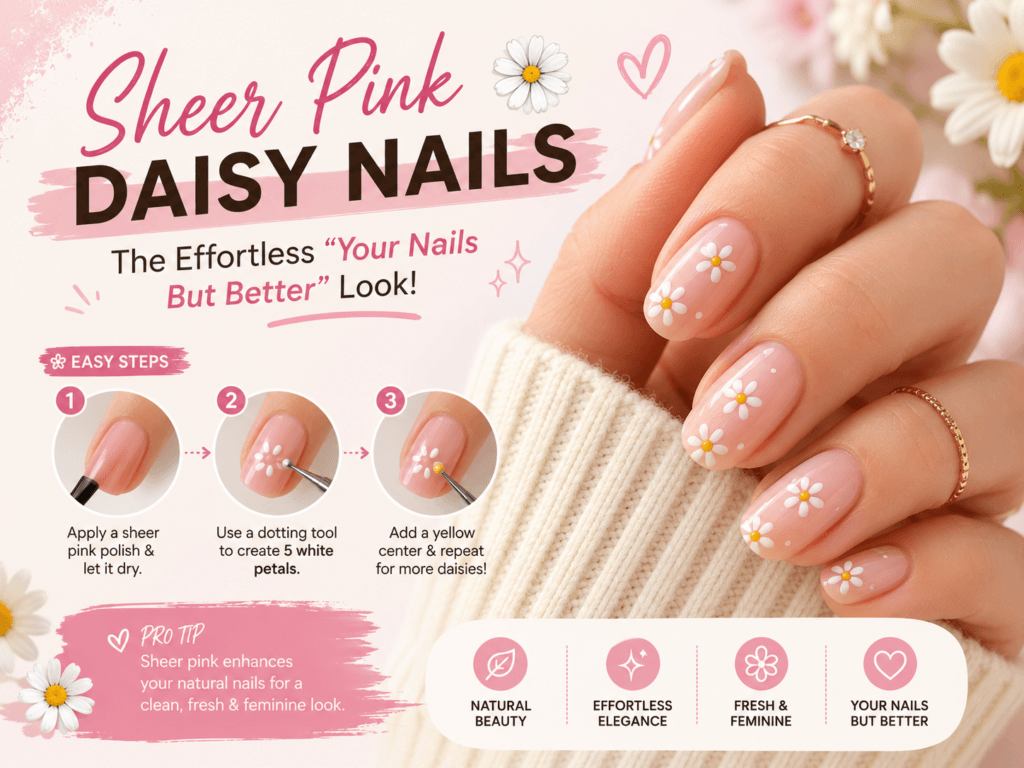
3. Sheer Pink Daisy Nails — The Effortless “Your Nails But Better” Look
Want something soft, romantic, and wearable every day? Sheer pink nails with white daisies is the answer. This design gives the illusion of a barely-there manicure while still looking intentional and put-together.
The beauty of this look is its delicate, understated elegance. The sheer pink base lets your natural nail color show through, making it flattering on every skin tone. The white daisies with yellow centers add just enough detail to make it feel special.
What you need:
- A sheer or jelly pink nail polish
- White nail polish (petals)
- Yellow nail art pen or dotting tool
- A fine nail art brush
- Top coat
How to do it:
Step 1: Apply one or two coats of sheer pink polish. You want the color to be soft and translucent, not opaque.
Step 2: Paint small white daisies across the nails using a thin brush. Keep the flowers small and scattered — this is not a maximalist design. Think 2–3 daisies per nail at most.
Step 3: Add tiny yellow dots in the center of each flower.
Step 4: Apply a top coat to protect the design and add shine.
Why this works: The sheer base creates depth that an opaque polish can’t replicate. The flowers appear almost as if they’re floating on your nails — which is exactly the dreamy effect you want.
This design is perfect for weddings, garden parties, or any occasion where you want to look polished without being overdone.
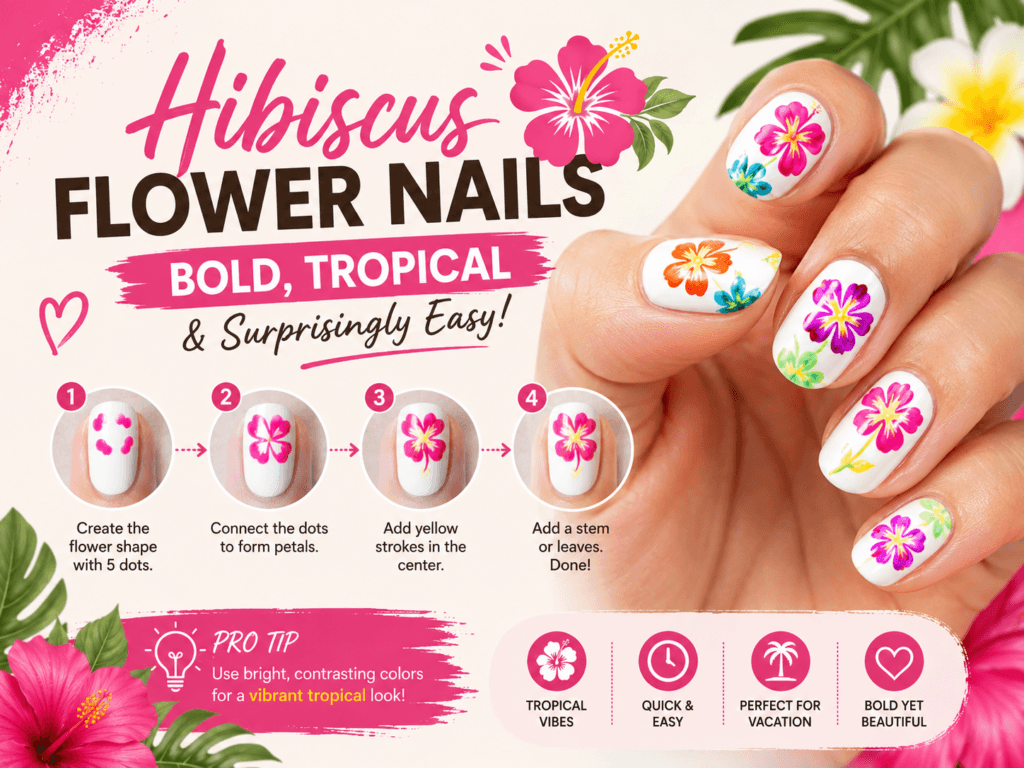
4. Hibiscus Flower Nails — Bold, Tropical & Surprisingly Easy
Ready to go bold? Hibiscus nail art looks complex but is actually one of the most beginner-friendly designs once you know the technique. The secret is working in layers and not worrying about perfection — the organic, slightly imperfect petals are what give this design its charm.
What you need:
- White nail polish (base)
- Bright nail polishes in pink, magenta, orange, purple, blue, and green
- A thin nail art brush
- Top coat
Step-by-step tutorial:
Step 1: Apply a clean white base coat and let it dry. White gives the colors maximum vibrancy.
Step 2: Using a thin brush loaded with your first flower color (try magenta or hot pink), paint 4 rounded petal shapes loosely arranged in a cross pattern. Don’t connect them yet — leave a small gap in the center.
Step 3: Go back in with the same color and fill in the petals, adding slight texture and depth by layering slightly darker polish at the petal edges.
Step 4: Add a different, contrasting color in the center of the flower — yellow, orange, or a deeper shade of the base color all work beautifully.
Step 5: Repeat on each nail using a different color combination — this is what gives the look its vibrant, playful energy. Try orange on one nail, blue on another, green on the next.
Step 6: Seal with top coat.
Pro tip: Each nail can be a different color — this is not a matching manicure, it’s a maximalist celebration of color. The more variety, the better this look gets.
This design is ideal for summer vacations, beach days, or whenever you want your nails to do the talking.
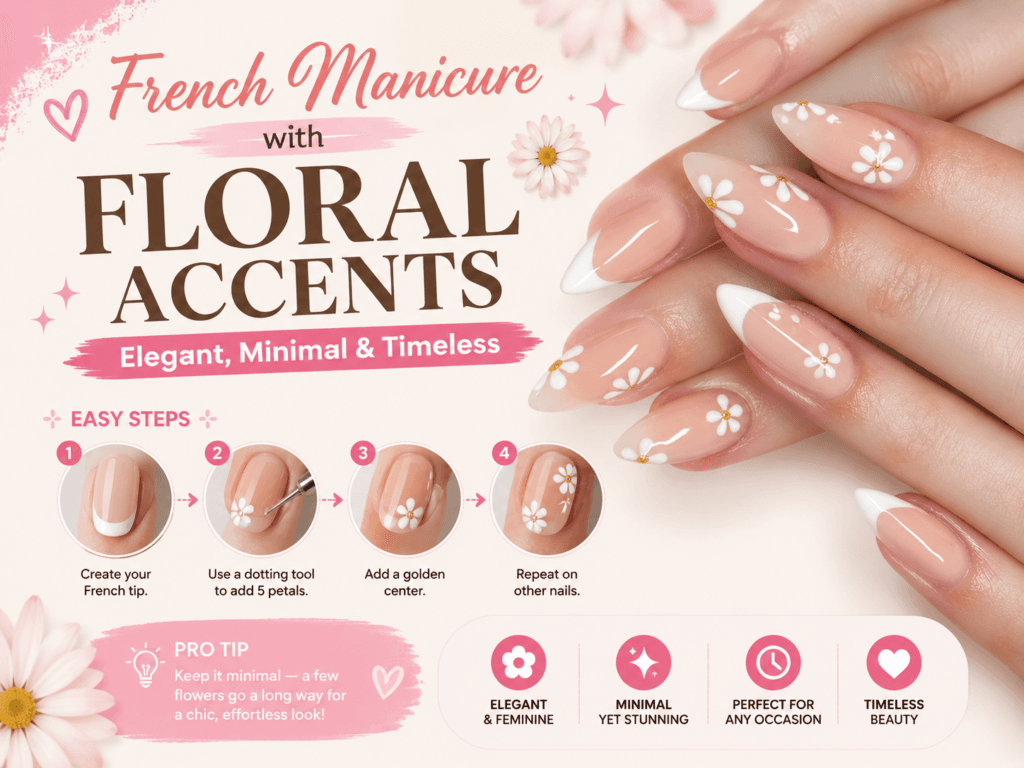
5. French Manicure with Floral Accents — Elegant, Minimal & Timeless
For those who love a more refined aesthetic, French manicure nails with delicate white flowers and gold centers is the ultimate elevated manicure. This look combines the classic sophistication of a French tip with the softness of botanical nail art.
The result is effortlessly chic — the kind of nails that get compliments at dinner parties, job interviews, and weddings alike.
What you need:
- Nude or sheer base polish
- White nail polish (French tips and flower petals)
- Gold nail art pen or gold glitter polish (centers)
- A thin nail art brush
- Top coat
How to create this look:
Step 1: Apply a nude or sheer base coat. For a modern twist on the classic French, use a slightly curved white tip instead of the traditional straight line.
Step 2: On your accent nails (ring finger and middle finger), skip the French tip and instead paint small white flowers directly onto the bare nude base. Use 5 small petal strokes arranged in a circle for each flower.
Step 3: Add a tiny gold dot in the center of each flower using a gold nail art pen or the tip of a toothpick dipped in gold glitter polish.
Step 4: Mix the two elements — some nails get the French tip, some get the flowers, and some can have both a French tip and a small flower in the corner for extra detail.
Step 5: Seal with a high-shine top coat to make the design look salon-quality.
Style note: This design works best on almond or stiletto-shaped nails, as the elongated shape gives the flowers more room to breathe and creates an elegant, editorial finish.
Which Flower Nail Design Should You Try First?
Not sure where to start? Here’s a quick guide:
- Total beginner? → Start with the bobby pin hack. It requires zero nail art tools and takes less than 10 minutes.
- Love a classic spring vibe? → Go for the coral daisy design. It’s cheerful, easy, and endlessly wearable.
- Prefer something subtle? → The sheer pink daisy look is soft, elegant, and perfect for everyday wear.
- Want to make a statement? → The hibiscus design is bold, colorful, and uniquely you.
- Going somewhere special? → The French manicure with floral accents is polished, sophisticated, and always appropriate.
Essential Tips for Beginner Flower Nail Art
Always start with a dry base. Rushing this step is the number one mistake beginners make. Wet polish underneath will smudge your flowers no matter how careful you are. Wait at least 5 minutes after your base coat before adding any nail art.
Less polish on the brush is more. Overloaded brushes create blobby, undefined shapes. Wipe most of the polish off your brush or dotting tool before each stroke for crisp, clean lines.
Use a top coat every time. Not only does it protect your design and extend wear, it also smooths out any texture and gives your nails a professional, high-shine finish.
Mistakes are fixable. Keep a small brush dipped in nail polish remover nearby. You can clean up edges and correct mistakes quickly before the polish dries.
Practice on paper first. Before painting on your nails, practice your flower shapes on a piece of paper or a plastic bag. This builds muscle memory and gives you confidence before the real thing.
Final Thoughts: Flower Nails Are for Everyone
You don’t need to spend a fortune at the nail salon or have years of experience to wear beautiful floral nail art. With the right technique, the right tools, and a little patience, any of these 5 designs is completely achievable at home — even if this is your very first time trying nail art.
Start simple, have fun with color, and remember: the best nail art is the kind that makes you smile every time you look at your hands.
Save this guide, try your favorite design, and share your results — we’d love to see what you create. Full tutorials and more nail art ideas at egella.com
